meetings 1998 - >
![]() Fault
diagnosis
Fault
diagnosis
![]() Buyer's
guide
Buyer's
guide
![]() Rims
Rims
![]() Weber
Dellorto
Weber
Dellorto
![]() Camshafts
Camshafts
![]() Engine
types
Engine
types
![]() Sizes
and weights
Sizes
and weights
![]() Spider
pedigree
Spider
pedigree
![]() 1966
Duetto + US
1966
Duetto + US
![]() 1750Veloce
1750Veloce
Via Veloce by Wille R. www.veloce.se On the Internet since November 1995 and still here.
Webers and spark plugs? Learn how to tune them. The carburetor datas are here. NGK B7ES spark plugs The Golden Lodge 2HL is a great spark plug. However, During the last years I have been using the NGK sparks. Be careful so you get the correct plug for your 105 engine. I use B7ES and not the BP7ES. The "P" indicates that the electrode is a bit further down on the spark plug. The NGK refer to this as "projected insulator". The B7ES have the correct temperature and the electrode is not causing picking and maybe causing other ignition problems.
If I understand the NGK information correct, driving with a "P" spark plug might give you trouble with pinking or what ever you call it over there. The ignition module is made by Bosch # 0227 100 111. Same as Peugot, Citro�n and Volvo among others use. Weber tuning for me! Spica tuning is here in PDF, 3.6Mb to download and here's yet another Spica manual www.shorey.net I have Weber carbs on my Spider. Here's the adjustment procedure as I do it. The procedure is the same on Dellorto. The entire manuaul is here to for you to download. Synchro tools and 4 column manometer kit are in stock here www.racecar.co.uk
Start by making sure that the CHOKE lever under the dash is pushed in fully. Check that the choke cable is allowing the enrichment levers on the back of the Webers return to their stops. Then loosen the clamps with a 7 mm wrench and push the levers to their stops. Do not forget to tighten the clamp screws. Check the FUEL HOSES for cracks (especially near the ends) or leaks. Replace them if they look too bad. Empty the water separator and inspect or replace the FILTER. Now, check for FULL THROTTLE OPENING. Have a helper step on the accelerator pedal while you watch the throttle shafts rotate to the fully open position. Gently adjust the linkage, if necessary. Make sure that the bellcrank under the carbs is not sticking on its shaft.
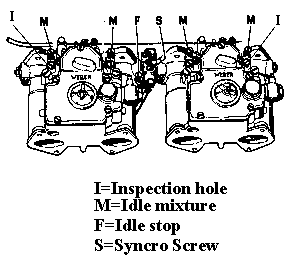
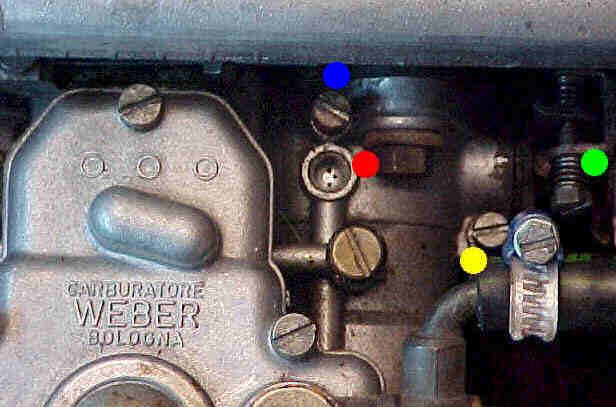
Check and make sure that the throttles are SYNCHRONIZED. Remove the brass plug (above the off-idle holes) of each carburetor section. Shine a flashlight into each of the holes to see that the edge of each throttle plate is aligned with the same hole when the throttle is slightly open. The brass plug is removed on this photo, red dot. There are three holes. Gently adjust the rear carburetor throttle by tampering with the idle adjusting screw, yellow dot. Check that you can see the throttle through one of the holes. Adjust the spring- loaded screw, green dot, in the linkage between the two Webers until you can see the throttle through the corresponding hole. Use a mirror and a light and shine through the holes vy the air cleaner. Then you have the carbs synchronized Now gently adjust the idle screw a few turns. Later, you will have to adjust this screw again to get the proper idling revs. The spring- loaded screw will not need any attention any more. Make sure that the Idle Stop Screw is NOT against its stop when you are making the adjustment or you will be even more confused. Check the FLOAT LEVEL. A) Remove some fuel from the carbs and let the engine idle for two minutes. Remove the wingnut caps. B) Then, use the depth gauge end of vernier caliper to measure from the top of the lower shelf to the top of the fuel surface. DCOE spec = 1.14 inch (29 mm+4.5 mm). If the depth is NOT correct, the top plate of the carburetor must be removed. Carefully bend the tab on the float assembly that touches the needle valve. Reassemble and test the float level as before.. Check for Intake System AIR LEAKS while engine is running. Wiggle the carbs and pour water on the donuts and listen for a change in the engine speed. Adjust the IDLE MIXTURE.
|